viernes, 28 de diciembre de 2012

Hibernate - Queries

Load an entity

There are two forms to get an entity with the methods load() or get().

public Category getCategory(Long catId) throws DataAccessException {
    return (Category) this.getSessionFactory().getCurrentSession()
                                              .load(Category.class, catId); }

public Category getCategory(Long catId) throws DataAccessException {
    return (Category) this.getSessionFactory().getCurrentSession()
.get(Category.class, catId); }
The difference are:
  • load()
    • Throws an exception if there isn't any row.
    • Has performane benefits.
  • get()
    • Return null if there isn't any row.
HibernateTemplate - Using Parameters with findByNamedParam
In case of use only one parameter, you need the query, parameter name and the value.
public List<ArtEntity> getArtworkInCategory(Long catId)
                                             throws DataAccessException {
    return this.getHibernateTemplate().findByNamedParam(
        "select art from Category cat " +
        "join cat.artEntities art " +
        "where cat.id = :catId ",
        "catId", catId
    );
}

In case of many parameters, you need the query, array with the parameters and the array with corresponding values

public Person authenticatePerson(String username, String password)
                   throws DataAccessException, AuthenticationException {

    List<Person> validUsers = this.getHibernateTemplate().findByNamedParam(
        "select people from Person people where" +
        "people.username = :username " +
        "and people.password = :password",
         new String[] {"username", "password"},
         new String[] {username, password }
    );

    if (validUsers == null || validUsers.size() <= 0) {
        throw new AuthenticationException("No users found");
    } else {
        return validUsers.get(0);
    }
}

Hibernate Core APIs - Using Parameters

public Person authenticatePerson(String username, String password)
                      throws DataAccessException, AuthenticationException {

    Person validUser =
        (Person) this.getSessionFactory().getCurrentSession().createQuery(
            "select people from Person people where" +
            "people.username = :username " +
            "and people.password = :password")
            .setString("username", username)
            .setString("password", password)
            .uniqueResult()
        );

    if (validUser == null) {
            throw new AuthenticationException("No users found");
} else {
        return validUser;
    }
}


martes, 25 de diciembre de 2012

Hibernate - hashcode / equals


Implementation of the methods equals and hashCode.


@Override
 public boolean equals(Object o) {
     if (this == o) return true;
     if (!(o instanceof Category)) return false;

      Category category = (Category) o;
     if (categoryName != null ?
             !categoryName.equals(category.categoryName) : category.categoryName != null) {
         return false;
     } else {
         return true;
     }
 }


 @Override
 public int hashCode() {
     return categoryName != null ? categoryName.hashCode() : 0;
 }

HIbernate - Annotations

Hibernate annotations

@Entity - To persist the class
@Basic  - Customized the persistance as lazy mode or aspects
@Transient  - Don't persist
@Temporal  - To persist dates  Ex. @Temporal(TemporalType.TIMESTAMP)
@Table  - To use a different name from table Ex. @Table(name = "HOGWASH")
@Column  - To map a column with different name @Column(name = "commentText")
@Id  - Define attribute as primary key

@GeneratedValue  - Use with @Id to create an identifier, by default AUTO. Ex @GeneratedValue(strategy=GenerationType.SEQUENCE, generator="COMMENT_ID_SEQ") to specify a different behavior


@OneToMany  - To establish the relation. Ex 
@OneToMany(orphanRemoval = true, cascade = { javax.persistence.CascadeType.ALL }) 
orphanRemoval - Delete any dereferenced
javax.persistence.CascadeType  - The eentity will be affected in any save/update

@Cache  - First try to find an instance in the cache, helpful for improve performance  Ex. @Cache(usage = CacheConcurrencyStrategy.NONSTRICT_READ_WRITE)
CacheConcurrencyStrategy.NONSTRICT_READ_WRITE -  In case of update the cache will be invalid

@Inheritance  - Ex. @Inheritance(strategy=InheritanceType.SINGLE_TABLE)
Types : Implicit polymorphism, Table-per-hierarchy, Table-per-subclass, Table-per-concrete-class 

@ManyToMany  - Ex. @ManyToMany(mappedBy = "artEntities")
mappedBy -  Define which table owns the relationship


lunes, 24 de diciembre de 2012

Web.xml - Servlet


There are two way to declare the configuration file


  • You can declare the file with the configuration in the tag <init-param>
   <servlet> 
     <servlet-name>galleryDispatcher</servlet-name> 
     <servlet-class>org.springframework.web.servlet.DispatcherServlet</servlet-class> 
     <init-param> 
       <param-name>contextConfigLocation</param-name> 
       <param-value> 
                 /WEB-INF/spring/spring-master-web.xml 
             </param-value> 
     </init-param> 
     <load-on-startup>1</load-on-startup> 
   </servlet> 

  • The second form is creating a file named galleryDispatcher-servlet.xml in WEF-INF/.  In this case automatically are going to look for a file "servlet-name"-servlet.xml


  <servlet> 
     <servlet-name>galleryDispatcher</servlet-name> 
     <servlet-class>org.springframework.web.servlet.DispatcherServlet</servlet-class> 
     <load-on-startup>1</load-on-startup> 
   </servlet> 


jueves, 20 de diciembre de 2012

Spring - Annotations

@Repository annotation should be used to indicate those classes that compose the DAO layer.

@Service annotation can be used to designate those classes that are part of an application's service facade, which are used in the web layer to handle requests

@Controller annotation denotes the presence of a POJO that should be used for Spring MVC interactions. Defines a service facade.

jueves, 13 de diciembre de 2012

Spring - Load properties

(application-context.xml)
In your application-context.xml, use the tag context:property-placeholder to define the property file where you have the values of your bean properties.


The value of location is the rath of your file:

<context:property-placeholder location="classpath*:spring/*.properties" />

In case that you have your property file outside your project:

<context:property-placeholder location=""file:///var/conf/conf.properties"/>
After define your file properties with the values:

db.name = test
db.user = user
db.password = password
db.port = 3306


Finally you can use the properties in your beans:


<bean id="dataSource"
class="org.springframework.jdbc.datasource.DriverManagerDataSource">

<property name="driverClassName" value="com.mysql.jdbc.Driver" />
<property name="url" value="jdbc:mysql://localhost:3306/test" />
<property name="username" value= "${db.user}" />
<property name="password" value="${db.password}" />

</bean>


(web.xml)
In the web.xml don´t forget to include the file application-context.xml


  <context-param>
<param-name>contextConfigLocation</param-name>
<param-value>
/WEB-INF/application-context.xml
</param-value>
</context-param>


Java Project Structure

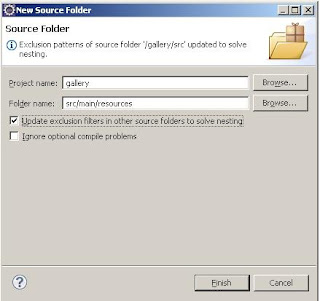
In Eclipse to add the structure folders choose New -> Soure Folder
Select the chech box "Update exclusion filters into other source folders to solve nesting"


  • Within the project_name folder, we'll create the folders that are customary for a Java application:

project_name/src
project_name/src/main
project_name/src/main/java
project_name/src/main/resources


  • For web applications, we need a webapp and WEB-INF folder:

project_name/src/main/webapp
project_name/src/main/webapp/WEB-INF

  • We also need to create the folders that are required for unit testing our application:

project_name/src/test
project_name/src/test/java
project_name/src/test/resources

  • And finally, we'll create the two folders where Spring configuration files are ordinarily placed:

project_name/src/main/webapp/WEB-INF/spring


miércoles, 21 de noviembre de 2012

How to read?

All the time we have new information and no time to learn everything so what I did was to learn how to read faster.

What I learned was the next points previous to the lecture:


  1. About the material
    • Where comes the information?
    • How many time I need to spend?
    • What is the relationship with me (job, hobbies)??
    • Is the material appropiate?
  2. What I want to read?
    • Why I chose this material?
    • What kind of information Am I expecting?
    • Do I need to read everything?
    • What the purpouse of the new information?
    • The new information Would increase my knowledge?
  3. Previous to read
    • What I am expecting to learn?
    • Would it satisfied my initials expectations ?
    • Would it be easy or difficult the lecture?
  4. Before read
    • Your expectations were justified?
    • Did you accomplish your expectations?
    • Did you get a benefit, like save time or arise your knowledge?
    • If you read the material for first time, would you change something?

domingo, 4 de noviembre de 2012

Drools First Step


For this example use Eclipse Juno, Drools 5.4.0

  1. Install in Eclipse the drools plug-in 
    • Help -> Install new Software 
    • Typer in "Work with" http://download.jboss.org/drools/release/5.4.0.Final/org.drools.updatesite/.  That change according with the last version
    • Click Add
    • Type in "type filter text", Drools
    • Select the chechbox 
    • Click Finish
  2. Create the Drools Workspace 
    • File -> Properties 
    • Type "Drools" 
    • In the window left side -> Configure workspace setting -> Add 
    • Select from the uncompressed zip the folder \binaries, in my case "drools-distribution-5.4.0.Final\binaries"
    • Click Ok to accept the changes
  3. Create a Drools Project to verify
    • File -> New Project -> type "Drools"
  4. Create a Java class to invoke the rules
    • Implement KnowledgeBuilder to parse the DRL files
    • Implement KnowledgeBase to compare the object Vs rules
  5. Insert some object to evaluate the rules

viernes, 2 de noviembre de 2012

Project First Steps

Develop a project managment plan

I write this as result of taking one Project course and the main points are:

  1. Establish the project duration
  2. Calendar configuration
    • Before start writing the activities configure the calendars to manage the tiem that each team member is going to be have in the project
    • Configure the labors hours and hollidays
    • Option: Project -> Change work time -> Create calendar
    • To manage globally the calendars and share between different projects
    • Option: File->Information->Calendars->  
    • Activity duration is different to the duration of the labor day
  3. Activities
    • Define the block of activities 
    • Select Format -> Schema number,  to list the activities
    • Relation between activities
      • Finish to Start
      • Finish to Finish
      • Start to Start
      • Start to Finish
    • Define Automatic or Manual dependency between activities
      • Always work with tasks of the same level
  4. Milestone
    • Used to define a point of control
    • Define dependency between milestones
  5. Constraints
    • All the activities has to be programed as automatic, if not the type of constrains are unavailable.
    1. Deadline.- Before type a deadline will appear a green arrow pointing the date
    2. Constraints
      1. As late as possible
      2. As soon as possible
      3. Finish no earlier than
      4. Finish no later than
      5. Must finish on
      6. Must start on
      7. Start no earlier than
      8. Start no later than
    3. Date constraints 
  6. Resources
    • Use View -> Details
    • Formula   Work = Duration * Resources (Unit)

martes, 30 de octubre de 2012

The Focus Solution

The idea of this philosophy is just be focus on the solutions as goal, following the next steps:


  1. Solutions, not problems
    • Detect what is working
    • Take in mind what you want
      • What do you want to accomplish today?
      • Will you be aware if you've made progress?
      • What works for you generally?
    • Solution talk
  2. Inbetween-the action is in the interaction
    • Do small changes
  3. Make use of what's there
    • The solution is in front of you
    • Everything is a useful thing
    • Use of counters
  4. Possibilities - Past, Present, Future
    • Past - There is a past victory or triumph. 
      • Using a scale where 10 is perfect and 1 is nothing, where are you?? Then describe how you get from the 1 to 2, then from 3 to 4, etc until achieve the perfect future.
    • Present - Focus and use the things that are working fine, develop a positive trend
    • Future - Create the perfect future, how the perfect future is 
  5. Language
    • Keep the language simple
  6. Every case is different
    • There isn't a general solution
  7. Optimistic and pessimism


domingo, 23 de septiembre de 2012

Practicar ingles

Que mejor manera de practicar ingles con música y las canciones que conoces.

http://www.lyricstraining.com/


Todos queremos aprender ingles para mejorar en nuestras carreras pero primero debemos disfrutar de lo que hacemos.

Attitude


miércoles, 19 de septiembre de 2012

Blog - I Creación


Todo debe construirse desde las piedras y en Blogger se inicia con una cuenta de Gmail, acceder a www.blogger.com y dar clic en "Nuevo Blog".

Después deberemos empezar a llenar las tres partes fundamentales del Blog.

1. Título. Es el nombre del Blog y es el primer elemento de identificación. 
Sirve como primer punto para captar la atención de los lectores, como:
               * Asociaciones (Mexprocan)           
               * Promoción de productos (Pequeño Cerdo Capitalista)
               * Servicios independientes (Matuk)
               * Diversión (SSD Fanatico)

Si desean hablar de varios temas les recomiendo mejor crear varios blogs, para una mejor administración del contenido que se traduce para los usuarios como un blog especializado.

En caso de hablar de diversos temas pero con un mismo enfoque pueden usar las páginas, por default solo tienen la página principal.

2. Dirección. Es la URL a teclear para encontrar tu sitio y usualmente es el titulo del Blog sin espacios. Debemos ser consistentes siempre con nuestro objetivo y contenido del blog.
              * Mexprocan http://mexprocan.org/
              * Pequeño Cerdo Capitalista www.pequenocerdocapitalista.com
              * Matuk    www.matuk.com
              * SSD Fanatico  www.sdd-fanatico.org/ 
  
Pueden ocupar el dominio blogspot.com en un inicio para no invertir en un dominio personalizado y no desviarse de la creación del Blog. Posteriormente pueden adquirir el dominio pero deben considerar el plazo, costo del servicio y tipo de dominio como .com, . mx, .ca, entre otros.

3. Plantilla. Es la parte gráfica de tu Blog incluyendo los colores y distribución de tu contenido. En un inicio pueden ir probando los diversos estilos, colores e imágenes de acuerdo a tu contenido y propósito pero debes definir uno para comodidad de los lectores.

Al final regresaran a la pagina principal donde dieron clic en "Nuevo Blog" con un cambio a la derecha con el nombre de su nuevo Blog, den clic en su nombre y verán las opciones propias de su nuevo Blog.

En la segunda parte veremos la parte de la personalización del Blog.

Rodrigo Velasco


La intensión de este Blog es poder documentar y compartir el conocimiento que a través del tiempo se me ha atravesado en este Tao de IT. 

Siempre dicen que es bueno leer pero he aprendido que se debe construir algo para que sea beneficioso ese conocimiento adquirido, ya que de otra manera solo se queda como un dato anecdótico sin mayor utilidad.

En esta época es fácil encontrar demasiada información y lleva mas tiempo leer toda esa información. Así que por sugerencia, me agrado la idea crear este Blog para compartir los temas de mi interés y a la vez contribuir con mi experiencia.

Los temas principalmente estarán enfocados a ITManagement Finanzas debido a mi carrera profesional como Ing. en Sistemas Cmputacionales.