jueves, 27 de febrero de 2014

SQL Server - Linked Server

How to import an Excel file using Linked Server

1.- Download the Microsoft Access Database Engine 

http://www.microsoft.com/en-us/download/details.aspx?id=13255

In my case I installed the x64 version, to avoid problems I did through the console.

  • Open a cmd console as Administrator
  • Change the path where is your AccessDatabaseEngine_x64.exe file
  • Execute the file adding at the end /passive, example: 
C:\Users\ERODVEL\Documents>AccessDatabaseEngine_x64.exe  /passive
2.- Open your SQL Server Management Studio

  • Review that the Provider has been installed
  • Select Microsoft.ACE.OLEDB.12.0 and right click in Properties, and review that the only selected option is "Allow inprocess".


  • Other form is by code    
EXEC sp_MSset_oledb_prop N'Microsoft.ACE.OLEDB.12.0', N'AllowInProcess', 1
GO


  • Add a new Linked Server using the following code
EXEC master.dbo.sp_addlinkedserver
    @server = 'ExcelServer2',
    @srvproduct=N'ACE 12.0',
    @provider = 'Microsoft.ACE.OLEDB.12.0',
    @datasrc = 'C:\Users\YOUR_USER\Documents\YOUR_EXCEL_FILE.xls',
    @provstr = 'Excel 12.0;HDR=YES;'


  • In the properties, configure the Security 
If not the error will be:
Cannot initialize the data source object of OLE DB provider "Microsoft.ACE.OLEDB.12.0" for linked server 

Queries

To do a query
  • Reference the table as [Linked_Server_Name]...[Tab_name$]

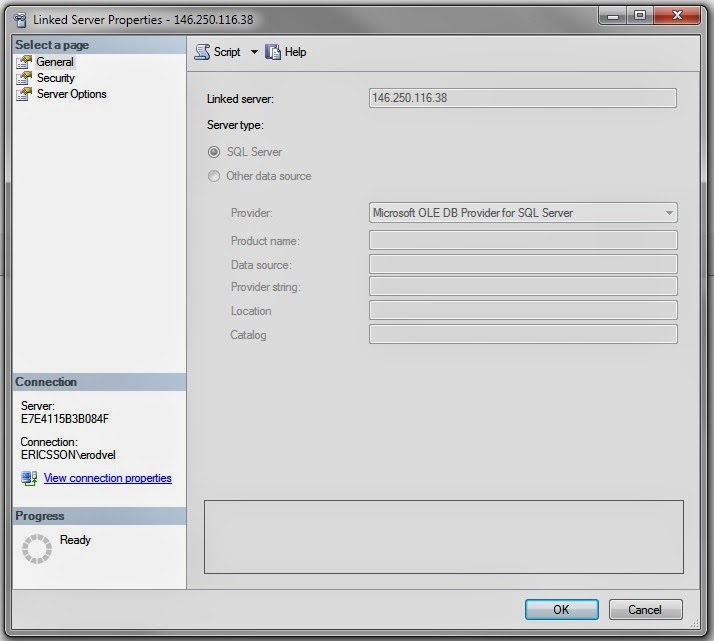
Linked Server to another Sql Server Instance

  1. Create a New Linked Server
  2. In the General section
    • Type in Linked Server the name or IP of the sql server to connect
    • In Server Type: Select SQL Server,
  3. In the  Security Tab, select "Be made using this security context" 
  4. Type OK

Using XLSM

When create the Linked Server in the Provider String property @provstr  change to Excel 12.0 Macro, where Macro is the key

EXEC master.dbo.sp_addlinkedserver
    @server = 'ExcelServer2',
    @srvproduct=N'ACE 12.0',
    @provider = 'Microsoft.ACE.OLEDB.12.0',
    @datasrc = 'C:\Users\YOUR_USER\Documents\YOUR_EXCEL_FILE.xls',
    @provstr = 'Excel 12.0 Macro;HDR=YES;' 


Security

To configure the security add  to the script
 
 EXEC master.dbo.sp_addlinkedsrvlogin @rmtsrvname=N'Test',@useself=N'False',@locallogin=NULL,@rmtuser=NULL,@rmtpassword=NULL

Update 

    UPDATE DATA
    SET [Result] = @result
    FROM OPENROWSET('Microsoft.ACE.OLEDB.12.0',
    'Excel 12.0 Macro;HDR=Yes;DATABASE=C:\\SRC\Period.xlsx',
    'SELECT [Result] FROM [Period$] WHERE [Result] IS NULL') AS DATA

References

http://akawn.com/blog/2012/01/query-and-update-an-excel-2010-spread-sheet-via-a-linked-server/


http://vogtland.ws/markedwardvogt/?p=991

http://www.excel-sql-server.com/excel-import-to-sql-server-using-linked-servers.htm


SQL Server - Tips

List All Tables of Database


USE [YourDBName]
GO 

SELECT 
*FROM sys.Tables
GO


Insert structure from one table to another


SELECT *
into new_table
FROM origin_table where 1 =2 

How to create a counter

Use the function ROW_NUMBER ( ), where the syntaxis is
 
ROW_NUMBER ( ) OVER ( FIELD order_by_clause )
 
Where FIELD  is the name of the column you want to use to start counting. Example:

SELECT ROW_NUMBER() OVER(ORDER BY SalesYTD DESC) AS Row, 
FROM Sales.vSalesPerson
 

Enumerate rows ... 1.2.3....

 
ROW_NUMBER() over ( ORDER BY [Job Stage]) as [pyramidPosition]
 

Reset the enumeration  ..... 1.2.3....1.2.3


ROW_NUMBER() over (partition BY idProject ORDER BY [Job Stage]) as [pyramidPosition]
 
http://sqlfiddle.com/#!6/501c0/2/0
 
 Update Table from Select
 

Update projects

set projects.tg4Real = [TG4 Date Real DD/MM/YYYY] ,
 projects.tg5Real = [TG5 Date Real DD/MM/YYYY] 
from
 projects p
inner join
 gtt...[Upload$] u
on p.projectName = [Project Name]


Multi user

ALTER DATABASE DATA_BASE SET MULTI_USER; 
 

Add user to a DB

Can you check it by Going To Security --> Login-->Right and Click Property and then goto user mapping tab. Then select the database


Convert String Dates to Date/Datetime 

From '12/10/25' to date 
CONVERT(DATE,CAST ( RTRIM( LTRIM([CREATION DATE])) as nvarchar), 103) 

From '16/01/2007 3:03:35:270AM' to datetime
From '23/06/2014 09:07:17 a. m.'  to datetime
CONVERT(datetime, ( RIGHT(LEFT([START TIME],5),2) + '/'+LEFT([START TIME],2)+'/'+ RIGHT(LEFT([START TIME],10),4)+  SUBSTRING([START TIME],11, 9 ) + REPLACE( SUBSTRING([START TIME],21, 4 ), '. ', '' ) ) , 120 ) as ODBC_datetime


Android - First Steps VI


Arrays

In your project in the following path: res -> layout folder, create an Android XML file. 
Select from the wizard in Resource Type : Values and named the Xml file as "javafacts.xml".


The XML file must have the following structure:

<?xml version="1.0" encoding="utf-8"?>
<resources>
    <string-array name="messages">
        <item>
First element</item>
        <item>Second element</item>
    </string-array>
</resources>


Get Array in code

In this case R.array.messages is by the name in defined in the XML file.
Resources resources = this.getResources();
        String[] javafacts =  resources.getStringArray(R.array.messages);


miércoles, 26 de febrero de 2014

Android - First Steps V

Preferences

Create XML file

  1. Create am Android Xml File 
  2. In Resource Type, select Preference
  3. In Root Element, select PreferenceScreen

Create a class

  1. Create a class that extends from PreferenceActivity.
  2. Override the method onCreate.
  3. Load Preference file
    • Use the method addPreferencesFromResource(R.xml.name_file);. //This method is deprecated in Android version after HoneyComb (Build.VERSION_CODES.HONEYCOMB).
      To knkow the version use: Build.VERSION.SDK_INT
    •  For later version after Honeycomb you need to use a FragmentTransaction and Fragment object, where Fragment receive an inner class that extends from PreferenceFragment.
if (savedInstanceState == null) {
            FragmentTransaction transaction = getFragmentManager()
                    .beginTransaction();
            Fragment fragment = new MyPreferencesFragment();
            transaction.replace(android.R.id.content, fragment);
            transaction.commit();
        } 


@TargetApi(Build.VERSION_CODES.HONEYCOMB)
    public static class MyPreferencesFragment extends PreferenceFragment {
        @Override
        public void onAttach(Activity activity) {
            super.onAttach(activity);
            Log.d("F", "I'm attached to an activity - I have a context!");
        }

        @Override
        public View onCreateView(LayoutInflater inflater, ViewGroup container,
                Bundle savedInstanceState) {
            this.addPreferencesFromResource(R.xml.penguin_prefs);
            return super.onCreateView(inflater, container, savedInstanceState);
        }
    }; 

  1. asda


lunes, 24 de febrero de 2014

Android - First Step IV

Tips

Best Image configuration

The best quality for image is Bitmap.Config.ARGB_8888

Create a message in the view

Toast.makeText(getApplicationContext(), path.toString(),
                Toast.LENGTH_LONG).show(); 

Permission to storage files

<uses-permission android:name="android.permission.WRITE_EXTERNAL_STORAGE"/> 

Get external directories

        File path = Environment
                .getExternalStoragePublicDirectory(Environment.DIRECTORY_PICTURES); 

Count the time

        SystemClock.uptimeMillis()

Make a pause

        postInvalidateDelayed(time_ms);

 Resources for all screen devices

Create a folder inside res folder and then a folder called  drawable-nodpi.  All the resources inside this folder will used without consider the device resolution screen.

Redraw the View

The method postInvalidateDelayed(int ms) notifies the system from a non-UIThread and the View gets redrawn in the next eventloop on the UIThread as soon as possible.

postInvalidateDelayed(40);


Views

How create an ImageView 

        Bitmap bitmap = Bitmap.createBitmap(8, 8, Bitmap.Config.ARGB_8888);
        Canvas c = new Canvas(bitmap);
        c.drawColor(0xff808080);
       
        Paint paint = new Paint();
        paint.setColor(0x800000ff);
        c.drawLine(0, 0, 3, 3, paint);

       
        ImageView v = new ImageView(this);
        v.setImageBitmap(bitmap);
        setContentView(v);

How create a View

Every time the view is draw always call the method OnDraw().

     //Same code as above

 View v = new View(this){
            @Override
            protected void onDraw(Canvas canvas) {
              
                canvas.drawColor(0xff808080);
                canvas.drawBitmap(bitmap, 10, 10, null);
                canvas.scale(arg0, arg1)
                super.onDraw(canvas);
            }
          
        };

How enable the menu option

Override the method onOptionsItemSelected and use the following code inside the if sentence.
@Override
public boolean onOptionsItemSelected(MenuItem item) {
// TODO Auto-generated method stub
int id = item.getItemId();
        if(id == R.id.action_settings) {
            Intent i = new Intent(this,MenuActivity.class);
            startActivity(i);
            return true;
        }
return super.onOptionsItemSelected(item);
}


viernes, 21 de febrero de 2014

Android - First Step III

Get Preferences

The method help to store information we want to store even after our app has stopped, and return a SharedPreferences object.

SharedPreferences pref = getPreferences(MODE_PRIVATE);

The parameter MODE_PRIVATE means that only our app can access to the store information.


GET/SET values

Use the methods: 

pref.getString("key",default_value)
pre.setString("key", value)

Sleep the interface  

It is not recommended to use this command, because all the interface will be frozen until the established time pass.

 SystemClock.sleep(time_in_ms);
        // SystemClock.sleep(2000); // Never do this!
        // Any long-running method will slow down
        // the whole look and feel of Android and
        // make your app very unresponsive and sluggish
 

Other option is use  postDelayed method, that execute a Runnable method after a specified time

private TextView mTextView;

@Override
    public void onClick(View arg0) {
               
       
Runnable adder = new Runnable () {
            @Override
            public void run() {
               
                int clickCount = 20 + mPrefs.getInt("clicked", 0);
                mPrefs.edit().putInt("clicked", clickCount).putBoolean("user", true).commit();
               
                mTextView.setTextColor(0xff00ff00);
                mTextView.setText("Click!" + clickCount);
               
            }
        };
       
        // Run the adder code in 2000 milliseconds time
        // i.e. 2 seconds
        mTextView.
postDelayed(adder, 2000);
       
    }


Android - First Step II

Create a ScrollView

This view create a scroll in all he view. In activity_main.xml file start with the tag <ScrollView>. Inside the tag <ScrollView> must be another Layout tag

<ScrollView xmlns:android="http://schemas.android.com/apk/res/android"
    xmlns:tools="http://schemas.android.com/tools"
    android:layout_width="match_parent"
    android:layout_height="wrap_content"
    android:paddingBottom="@dimen/activity_vertical_margin"
    android:paddingLeft="@dimen/activity_horizontal_margin"
    android:paddingRight="@dimen/activity_horizontal_margin"
    android:paddingTop="@dimen/activity_vertical_margin"
    android:fillViewport="true"
    tools:context=".MainActivity" >


     <LinearLayout
         android:layout_width="match_parent"
         android:layout_height="match_parent"
         android:orientation="vertical" >


    </LinearLayout>

</ScrollView>


Event after text change in EditText

After get the EditText element, as the following code:
mComment = (EditText) findViewById(R.id.comments);

Create a TextWatcher object, that is the responsible of expose link to the event.
TextWatcher watcher = new TextWatcher() {
           
            @Override
            public void onTextChanged(CharSequence arg0, int arg1, int arg2, int arg3) {
                // TODO Auto-generated method stub
               
            }
           
            @Override
            public void beforeTextChanged(CharSequence arg0, int arg1, int arg2,
                    int arg3) {
                // TODO Auto-generated method stub
               
            }
           
            @Override
            public void afterTextChanged(Editable arg0) {
                // TODO Auto-generated method stub
               
            }
        };


jueves, 20 de febrero de 2014

Android - First Step


Get an element

To get an specific element by id use the method findViewById
findViewById(R.id.name)

After you do a cast to the corresponding type
private EditText mName = (EditText) findViewById(R.id.name);

Link events with code

In the file activity_main.xml inside the object (for example: ImageButton, Button) use the attribute android:onClick="method_name"

After in the your Activity class (for example MainActivity.java) declare your method as you named previously (in this case method_name()), passing as parameter the View.

    public void method_name(View v) {
     //Your code
    }

Send message in the view (Toast)

Inside your method create a Toast object and use first the method makeText() and then show() method.


Toast.makeText(this.getApplicationContext(), R.string.app_name, Toast.LENGTH_LONG).show();

Animation

Inside the activity method (Ex. public void processForm(View view) {}  ), create the Animation object. In this case the method belong to a button.

Animation anim = AnimationUtils.makeOutAnimation(this, true);
view.startAnimation(anim);

----------------------- Intent ---------------------------------

Call another View

To call another View use the following code, where  SettingsActivity is your class' name.
 Intent i = new Intent(this,SettingsActivity.class);
            startActivity(i);

 Send a plain text message

Inside the activity method (Ex. public void processForm(View view) {}  ), create Intent object.

Intent i = new Intent(Intent.ACTION_SEND);
i.setType("text/plain");
i.putExtra(Intent.EXTRA_TEXT, "This is my message");
startActivity(i);

Send sms

Inside the activity method (Ex. public void processForm(View view) {}  ), create Intent object.

mPhone = (EditText) findViewById(R.id.phone); // this is a textbox

Intent intent = new Intent(Intent.ACTION_VIEW);
intent.setData(Uri.fromParts("sms", mPhone));
intent.putExtra("sms_body", comments);

Send mail and review configured email client

 Inside the activity method (Ex. public void processForm(View view) {}  ), create Intent object.

 Intent intent = new Intent(Intent.SEND_TO);
intent.setData( Uri.fromParts("mailto", "destiny_mail", null));
intent.putExtra(Intent.EXTRA_SUBJECT, "subject");
intent.putExtra(Intent.EXTRA_TEXT, "message");

   Validate email client


if( intent.resolveActivity(getPackageManager()) == null ){}

When the method resolveActivity return null there is not application to execute the Intent

Send an image file

Inside the activity method (Ex. public void processForm(View view) {}  ), create Intent object.
In this case you have to define the type of file and extension share.setType("image/jpeg").
Also you have to declare the URL where is the file with share.putExtra(Intent.EXTRA_STREAM, uri);
Finally you need to execute the activity like the others with startActivity and if you want configure the chooser application with your own message.

Intent share = new Intent(Intent.ACTION_SEND);
        share.setType("image/jpeg");
        share.putExtra(Intent.EXTRA_STREAM, uri);
        startActivity(Intent.createChooser(share, "Share using..."));

Get Resource / startActivityForResult()

This intent open the gallery. The method startActivityForResult return the result of the new created activity.


Intent intent = new Intent(Intent.ACTION_GET_CONTENT);
 intent.setType("image/*");
startActivityForResult(Intent.createChooser(intent,"Select..."), REQUEST_CODE);


After the intent finished the task execute the method onActivityResult, to use it you have to override the method in your code, one of the parameters the method received is resultCode, the parameter received as possible values: RESULT_CANCELED or RESULT_OK


 @Override
    protected void onActivityResult(int requestCode, int resultCode, Intent data) {
        if (requestCode == REQUEST_CODE && resultCode == RESULT_OK) {

 
    }
}

Scan new images

This intent do a refresh action to view the new images in our cellphone. The difference for this case is that instead of use startActivity to execute the intent, now you have to use
sendBroadcast method.

Intent intent = new Intent(Intent.ACTION_MEDIA_SCANNER_SCAN_FILE);
        intent.setData(uri);
        sendBroadcast(intent);


martes, 11 de febrero de 2014

C# GridView - How to know which element is


To know an element inside a method call from the view as OnTextChanged method, do a cast to sender parameter.

protected void txtOnBoard_TextChanged(object sender , EventArgs e)
    {
        TextBox txtJs = (TextBox)sender ;
        GridViewRow grdrDropDownRow = ((GridViewRow)txtJs.Parent.Parent);
    }

From sender you also can know how is the Parent element

C# Using tabs


To use tabs in C# use the TabContainer element from AjaxControlToolkit

Include AjaxControlToolkit

  1.  Include in the Web.config file, inside the tag <system.web> the following code

     <pages>
          <controls>
            <add tagPrefix="ajaxCTK" namespace="AjaxControlToolkit" assembly="AjaxControlToolkit"/>
          </controls>
        </pages>
     

Include TabContainer element

  • First  include TabContainer element that is the section where all the tabs will be displayed.
<ajaxCTK:TabContainer ID="TabContainerUpdate" runat="server"
                Height="800"
                CssClass="ajax__tab_style">

</ajaxCTK:TabContainer>

  • Second per each tab include the following code corresponding to each tab section, this code must be inside the TabContainer section code
<ajaxCTK:TabPanel ID="MsgApproveProject" runat="server"
                        HeaderText="Update Project"
                        Enabled="true"
                        ScrollBars="Auto"
                        OnDemandMode="Once">
                        <ContentTemplate>

/***   Tab section  ***/


                      </ContentTemplate>
</ajaxCTK:TabPanel>


Sony not detected on ADT

Configure the cellphone
  1. Go to Settings -> Xperia -> Connectivity
    • Select the option Install PC Companion, this option will install the drivers
    • Select the option Usb connetion mode
      • In my case work with Media transfer mode (MTP) that is the default option
      • The recommendations establish change to Mass storage mode (MSC)
    • Restart the computer
    • Restart the ADT


Review if you have the drivers installed (Windows)
  1. Open a explorer
  2. Right click on Computer
    • Select Manage
  3. Select Device Manager on left menu 
    • Select Portable Devices
    • Review if you have installed the drivers